
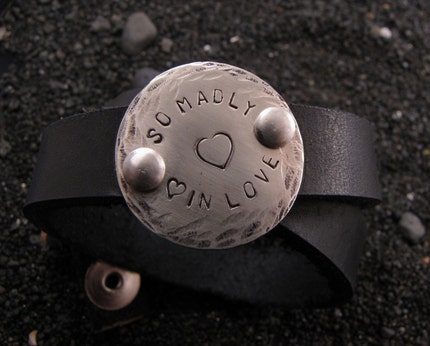
Friday, August 20, 2010
Caoimhe Lily is on SoopSee!
I've consolidated my jewelry pics and blog to make it easier to find everything in one place. That place is Soopsee, and you can check out my new website here at www.soopsee.com/profile/CLjewelry!
Saturday, June 19, 2010
The Family Heart Garden & Copper Wave pendants
I have created a new set of designs this week. These copper pendants are different, because they are rectangular instead of my usual circles.
The first is the Family Heart Garden. I hand stamped the pendant with a lovely garden of tiny hearts reaching for the sky. The hearts can symbolize your children or family members, and the flying angel heart can symbolize a loved one that has passed and is watching over their little ones from above, or the hearts can simply be enjoyed for their whimsical modern beauty.
Here are two examples of the Family Heart Gardens:


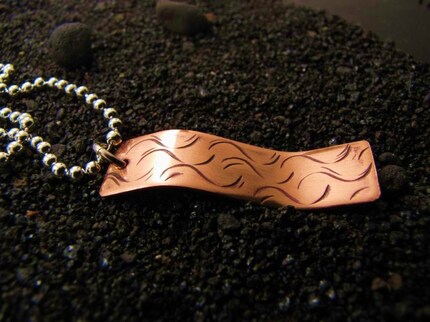
The next design I will share today is the Copper Wave Pendant. I hand crafted this beautiful pendant from a piece of copper sheet. After filing the edges and sanding it to create a smooth surface, I annealed it by applying heat from a torch and then bent it into a wave. I also tumbled it to harden the metal (so that it won't bend out of shape) and give it a polished look. The pictures do not do this piece justice, the copper is bright and shiny which makes it hard to photograph properly.
The wave pattern was stamped using a unique stamping tool that was hand carved by a metalsmith named John Peter. During his lifetime, John created many stamping tools for his own projects, in all different shapes and sizes, and I recently acquired a few of these one-of-a-kind stamps, as I mentioned in a previous post. I used one of these special stamps to create the pattern that you see here:
If you are interested in buying one of these family pendants or a limited edition wave pendant, please look for them on www.CaoimheLily.etsy.com or convo me on Etsy for details.
The first is the Family Heart Garden. I hand stamped the pendant with a lovely garden of tiny hearts reaching for the sky. The hearts can symbolize your children or family members, and the flying angel heart can symbolize a loved one that has passed and is watching over their little ones from above, or the hearts can simply be enjoyed for their whimsical modern beauty.
Here are two examples of the Family Heart Gardens:
The next design I will share today is the Copper Wave Pendant. I hand crafted this beautiful pendant from a piece of copper sheet. After filing the edges and sanding it to create a smooth surface, I annealed it by applying heat from a torch and then bent it into a wave. I also tumbled it to harden the metal (so that it won't bend out of shape) and give it a polished look. The pictures do not do this piece justice, the copper is bright and shiny which makes it hard to photograph properly.
The wave pattern was stamped using a unique stamping tool that was hand carved by a metalsmith named John Peter. During his lifetime, John created many stamping tools for his own projects, in all different shapes and sizes, and I recently acquired a few of these one-of-a-kind stamps, as I mentioned in a previous post. I used one of these special stamps to create the pattern that you see here:
If you are interested in buying one of these family pendants or a limited edition wave pendant, please look for them on www.CaoimheLily.etsy.com or convo me on Etsy for details.
Tuesday, June 15, 2010
Don't Eat the Beans
I've been away from my work bench the last few days, just spending time with family and taking a break from jewelry making (aside from sending out orders, of course). I have some new blog entries in mind for this week, and a new copper technique that I will be trying out soon, so stay tuned for that. For today though, I'm just taking it easy. I'm about to go cook some enchiladas and spanish rice, and then play with Caoimhe for a while before bedtime.
She still isn't old enough for preschool board games like Candyland (she's just under 2 years old), but I found a game today that I thought she might be old enough to play, it's called Don't Spill The Beans. It's just a little wobbly pot that you put plastic beans into, and when it gets too uneven it spills over. Easy enough for her to do, so I was excited to get it. But when we began playing, she kept asking if she could eat the beans and refused to put them in the pot. It made me nervous, so I switched the beans with goldfish crackers and tried again to get her to play, but she ate those up lol. So, we're going to have to play it after dinner when she's not hungry. :)
Enjoy your evening,
Nickie
Friday, June 11, 2010
One new stamp, and five on the way!
It's been over a week since my last entry, and a while since I've updated with any new designs. I have a few new things in the works, as I received some new charms in the mail today, but they're not ready to share yet. I do have a bracelet that I will soon be talking about here, and if you're a Facebook fan you've already seen it (if you aren't a Facebook fan, see my previous entry for details). It's a wicked dragon wraparound cuff, but because it deserves its own blog entry I will save it for tomorrow.
Tonight's entry is all about design stamps. These little stamps are what makes hand stamped jewelry so much fun. Design stamps usually run about $10 plus shipping, and are available in all sorts of designs. I always have a hard time resisting the urge to buy new stamps, and I've given in to temptation this week and bought six new stamps for my growing collection.
The first stamp I bought is a spiral finial stamp, and it's a fancy little thing that I will be using to decorate some of my nicer pieces. I have an anniversary gift to make this week so I will be breaking it in very soon. I've been looking forward to buying this stamp for a while now, so it's great to finally have it in my arsenal. Here's a pic of the stamp:

Isn't it gorgeous? It's one of the nicest stamps I've seen, for sure.
So now, I am currently the proud owner of these stamps (all of which are available to be used for custom jewelry requests): a princess tiara, leaf, heart, tiny heart, heart with wings, tiny star, fleur de lis, two baby feet, scroll, wavy line with dots, gift bow, flame, tear/petal shape, bird #1, bird #2, apple, and the new finial stamp.
The other five stamps that I have bought this week are not as fancy as this one, but they are just as wonderful. This is because the stamps are hand crafted and one of a kind. They are squiggly wave-like designs of differing sizes that can't be bought elsewhere, and I just couldn't pass them up. They were made by a man named John who created his own stamps by hand grinding, sawing or filing the ends of old Allen wrenches, cold chisels, and screwdrivers. These tools are made of very hard metal, which is hard as heck to put a nick in, much less shape and design. I can only imagine the work that went into these five stamps, and the many others that John made. Here is a picture of them:

Isn't that amazing? I would love to have the chance to sit and look through that whole batch of designs. It would be like Christmas morning to this aspiring metalworker. :)
Anyway, when John recently passed away, he left his stamps and several books full of amazing designs to his good friend Nik, who is planning to publish the designs into a book and is slowly selling the stamps to others who will use them. As you can see, the stamps have a real history, so I am proud to be the new owner to a handful of them.
I can't wait to see what I will be able to create!
Thursday, June 3, 2010
And The Winner Is...
Congratulations to Patricia who is the winner of the first official Caoimhe Lily giveaway!
Patricia was the 22nd person to become a fan of the Caoimhe Lily page on Facebook. Her name was chosen by a random number generator on Random.org. Her prize is a beautiful hand crafted copper bracelet, personalized with the name of her choice. Patricia, please message me by Saturday, June 5, to claim your prize!
If you didn't win this time, don't worry - there will be more contests and giveaways to come. Stay tuned to my Facebook page, and you can also follow my blog to stay informed of special deals and new items.
Also, remember that Facebook fans will receive 10% off of their orders throughout June with the coupon code FACEBOOK, so if you have your eye on a bracelet like the one Patricia has won, or a custom personalized necklace, now is a great time to make your purchase.
Thanks again, everyone!
~Nickie
*EDIT: Patricia has decided to forfeit her prize, and a runner-up has been chosen. Congrats to entrant #3, Casey S.!
Wednesday, June 2, 2010
Giveaway #1 - Personalized Hand Crafted Copper Bracelet
Who wants free jewelry? I know you do!
I'm holding a giveaway on my new Facebook page - and you could be the lucky winner! Click on the Like button on my Facebook page, and then suggest my page to your friends. When I reach 50+ fans, I will choose one lucky person at random to win a free handmade copper bracelet, personalized with their name and any of my design stamps.

You can become a fan and be eligible for the giveaway by clicking on the Like button on my page here: Become a Fan of Caoimhe Lily on Facebook
Good luck, everyone!
Saturday, May 29, 2010
Very busy week
The past week or so has been pretty busy. I've had a lot of orders go out (a big thank you to everyone who has bought something from me recently) and I've also made five or six new items. I just finished listing them in my store yesterday, with the exception of one that I will post pics of here. I'll probably add pics of some of the new items here tomorrow, as there are a couple I'm excited about sharing, but I'm too sleepy to do much tonight.
The item I want to share with you tonight is a copper bracelet that I just made this afternoon. As with many other things I create, this bracelet ended up looking much different than originally planned. It was supposed to have a butterfly design but in the end I decided it would look much better like this, and I'm saving the butterfly I cut out for a later date. Instead, I decided to go with hand stamped flowers, and the phrase "Bloom where you are planted" is the centerpiece. I used my new bird stamps, of course - I absolutely love these two designs and I've been using them whenever possible. I glued a Swarovski crystal to the center of the main flower, and the dark blue bead really pops with color against the copper, pulling the whole piece together nicely. The edges are hammered and darkened for an antique look, and overall I think this bracelet turned out quite nicely, especially considering it's the first cuff bracelet I've ever made. The bracelet is 2" wide, 20g thick, and is currently sized to fit my small 5" wrist but is adjustable.
It was rather hard to get a good pic of this bracelet because of its larger size (and I hate how closeup photos always show tiny dings and scratches that are barely noticeable otherwise) but I managed to get a few that were fairly decent. So, without further ado, here is my limited edition "Bloom where you are planted" copper cuff bracelet:


Monday, May 17, 2010
On Etsy's front page...twice in one week!
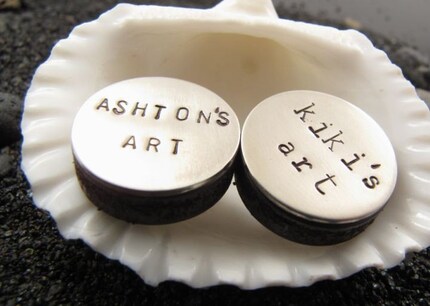
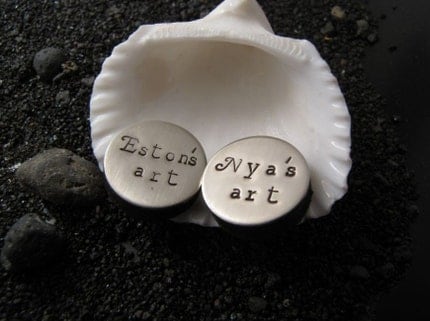
Yep, that's right! I made it on Etsy's front page twice in six days. The first item, featured on Tuesday 05/11, was my set of two children's art magnets. They're perfect for displaying art or for showing off a perfect grade on the big test. Here's a pic of my own magnets, and another set which were made for a customer:
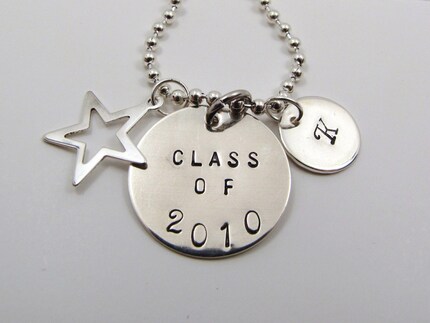
This afternoon, I was suddenly swamped with convos (short for Conversations, the messaging system on Etsy) and checked to see if I was featured again. My "Class of 2010" hand stamped pendant had been chosen as an alternate on a featured Treasury, and when the first item sold, mine took its place on the front page. The pendant instantly sold, and I got a few other sales as well. I've relisted the items, but if you're interested in the graduation pendant, I suggest buying it ASAP as I'm almost out of star charms.
I'm not sure how often a person gets the chance to be featured on Etsy's front page, but this seems almost too good to be true. I'm definitely honored that people like my items, and I'm so happy to finally get my store a little bit of publicity. Hopefully I can continue to make items that people are interested in, and make a decent living while I'm at it, lol!
Sunday, May 16, 2010
Gone To The Birds
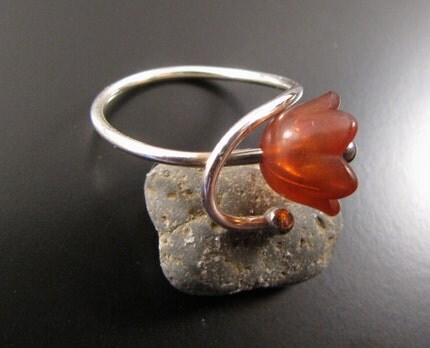
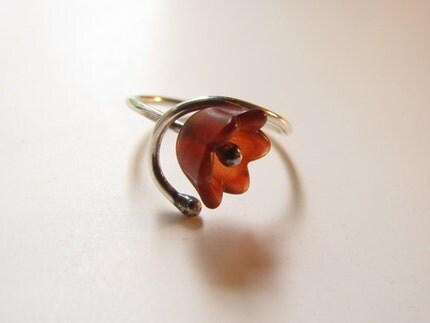
I bought a few new stamps this week, and I've been having a lot of fun with them. One is a bird, another is a tear shape, and the third is a flame stamp. The flame stamp is being used for a wedding ring that I am making for my brother in law. I haven't had the chance to use it elsewhere yet. But I have been having a lot of fun with the bird and tear stamps. I've been using the tear stamp to make flower petals, and I've added some new nature pendants to my store. They are very modern looking, and very cute! I also have a new bird stamp being delivered at the end of the week, so I will be able to vary the scenes a bit more. Here are the pictures I promised:
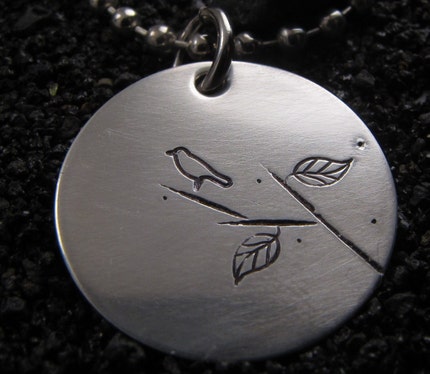


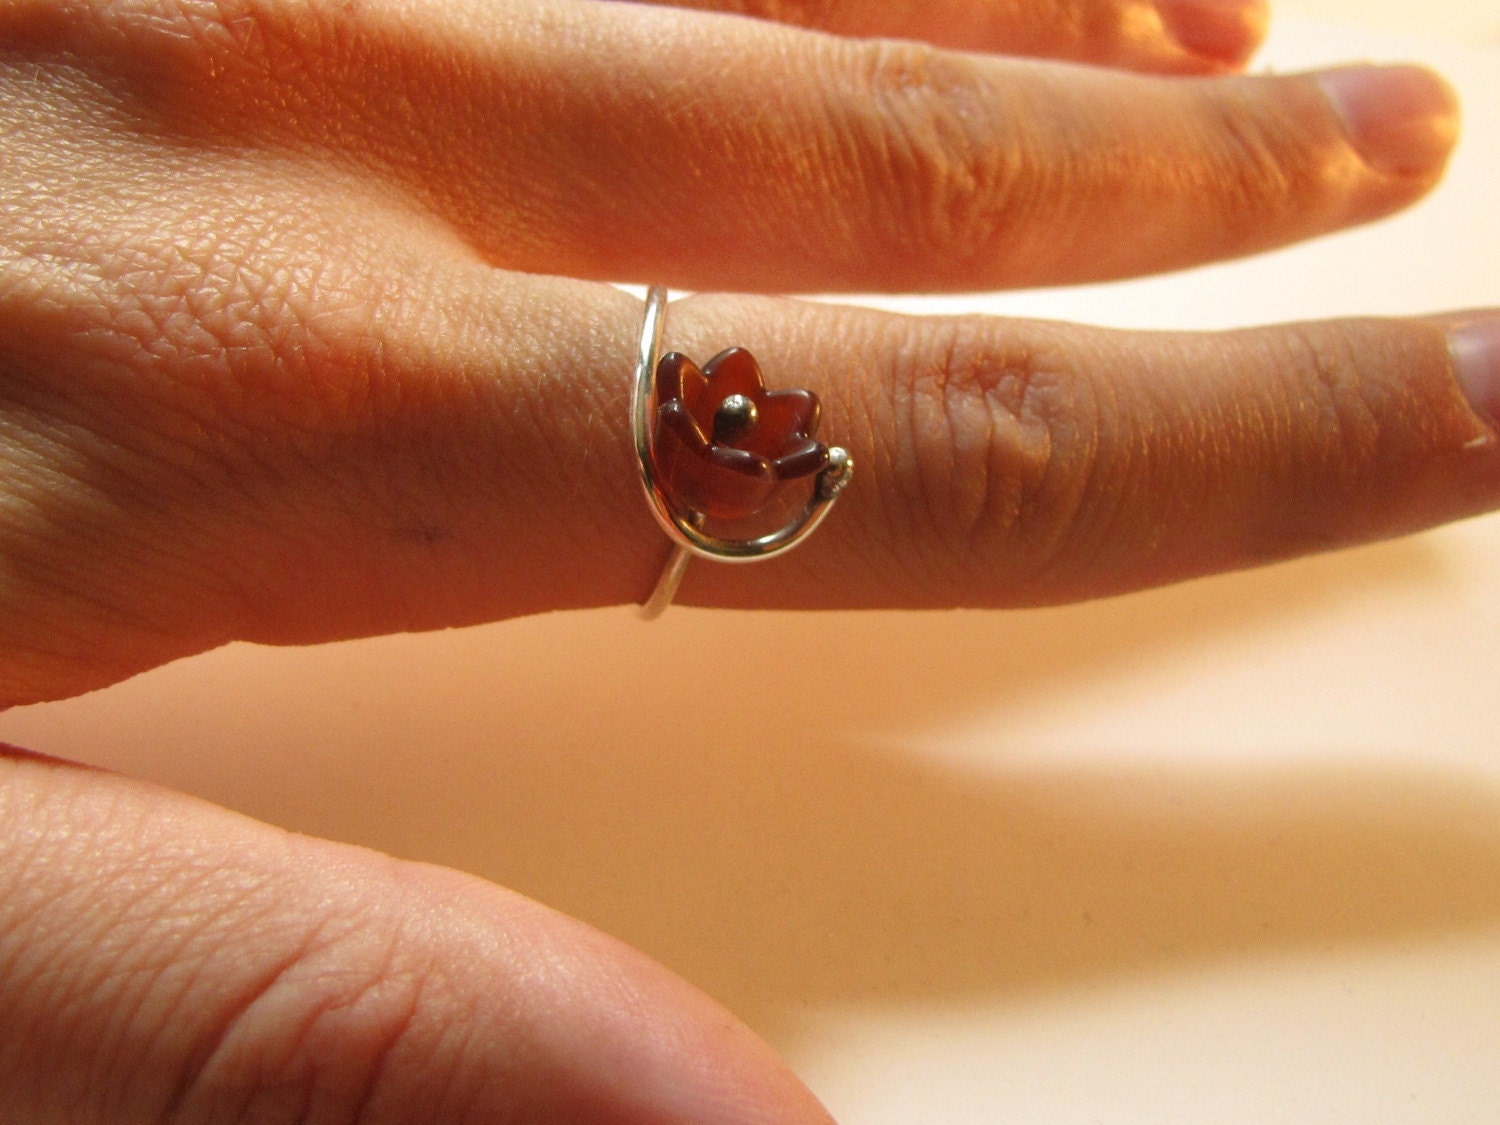
You can find these pendants and more for sale in my store. I also have a new ring for sale. This is a ring that I have been wanting to make for a while, and I finally managed to get it finished. I made one for myself, and I listed a second one for sale in my store. I custom ordered the flower in a dark red color, and it has a lovely satin finish. The dark red looks great next to the shiny sterling silver, and I really like the simplicity and beauty of the finished ring. I made myself a matching necklace, but I forgot to take pictures of it. I needed something to wear with my new black dress, and this ring & necklace set are just perfect. I will try to take a picture of the necklace tomorrow and post it here in this entry.
That's all for now, but I will be adding new bird necklaces soon so keep an eye out for those. They are all one of a kind, so if you see something you like, be sure to grab it quick before it's gone!
Wednesday, May 12, 2010
New items coming soon!
I have some exciting new items on the way...a new ring for sale, and a new pendant design that I'm excited about. Stay tuned, I will be updating my blog within the next day or two, as soon as I can upload the pics!
Sunday, May 2, 2010
Hidden Message Jewelry
A few days ago I had a conversation with a wonderful lady named Karin Castens who is one of my biggest inspirations. She writes a great blog under the name of Phantasteria, and her jewelry is just amazing. Like me, she has a love of creating hidden secrets in her jewelry. As I'm still new at the whole metalworking thing, I haven't made nearly as many wonderful creations as she has, but as we were talking about this very subject of jewelry secrets, I got the idea for my latest pendant.
Although I did not make the copper chain, I did make the clasp hook and the little double rings that are holding it onto the necklace. So that was fun, as I usually use store bought jump rings. I made the pendant out of two 1" copper discs. The pendant can be worn with either disc in front; it looks lovely both ways. The first disc is filled with what seems like a random stamping of letters, but by placing the second disc on top, a hidden message is revealed.
This is the type of pendant I really love making. It's unique, unusual, contains an element of mystery & surprise, and has an antique hammered finish that gives it a nice bit of personality. I'm a little surprised that it has received quite a bit of compliments, however, because while I like this sort of piece, I wasn't aware that it was something that others would like also. But, as it has been pretty well received, I will probably add a few versions of this in my store in the next week or so.
Here are the pics of my hidden message pendant (I still haven't thought of a good name yet...if you have a suggestion, please let me know):


Friday, April 30, 2010
New items for sale in my store today
Just a quick update to say that I've been working my butt off this past week, and have some new items in my store. Here are a few pics, and you can click on them for a link to their store listing:
I also made a double wrap leather bracelet for my sister that I have been needing to make for a long time. I have these for sale in my store also:
I also made a double wrap leather bracelet for my sister that I have been needing to make for a long time. I have these for sale in my store also:
Wednesday, April 28, 2010
She Sells Sea Shells...
I've begun to delve a little deeper into the world of metalworking, and just finished a project that I'm quite proud of. I love jewelry with moving parts and hidden secrets, and this piece has both! Using my hand tools and a sheet of copper, I created a pretty little seashell pendant that opens and closes. Hiding inside the shell is a little sterling silver "pearl."
This pendant was a little difficult to make, since it needed to open and close and I have never made anything with movement before. After drawing a clam shell template and cutting out the top piece of the shell, I used my center punch to etch lines in it to resemble the grooves in a real seashell. Next, I cut out a copper disc with my disc cutter, and used a doming block to shape it. At first, I wasn't sure how to connect the two pieces together, I just knew that it needed to open like an actual shell. So I decided to make a type of hinge by punching out a slot in the domed half, and wrapping the top piece over and through the back. This was the hardest part, getting it to wrap around loosely enough to open and close smoothly without the pieces falling apart.
Once the shell was complete, I added a copper chain and two sea-themed charms: a seahorse charm that I have been wanting to use (I love seahorses) and a little sand dollar that I made. For the pearl, I melted down a scrap piece of sterling silver into a ball. My plan was to solder the ball to the shell, but I accidentally left my torch on the ball too long and melted it. Eek! Then I noticed what a cool texture the melted silver created, so I added a bit more silver and melted it as well. Finally, I soldered another silver ball in place, and then threw the whole piece in the tumbler to polish it up. When I checked on it a while later, it was nicely polished but still had a bit of a rainbow color on the surface. I may still decide to polish it back to its original finish, but I thought the sheen made it look more realistic so I decided to leave it for now.
I had a lot of fun making this seashell pendant, especially it helped me to break out of my own shell and realize that I can make more than just flat stamped pendants if I put my mind to it. I plan on making one or two more to sell in my shop, so keep an eye out for it in the next couple of weeks.
Here are some pictures of the finished piece:


Tuesday, April 20, 2010
Customizing Your Guitar - cheap and easy ideas
As you may know from a previous post, I am in love with all things Steampunk. My husband Dale is a musician, and he fell in love with the style when I showed him various guitars online that had been steampunked. He has several guitars in his collection, and has wanted to steam one of them for a long while now. So we've been keeping an eye out for parts, and began the first phase of customization a few days ago.
We haven't made any major changes to the body of the guitar yet, but the cosmetic changes we've made have made the guitar a bit more interesting already. The cool thing is, most of the things we've done here can be repeated on your own guitar to give it a one-of-a-kind appearance. All you need is a little creativity and imagination.
The main thing we used were copper washers and wire, available at any hardware store. While you're there, look around and see if anything else catches your eye. There are so many different items on the shelves that can be altered (or even used as-is) to create a cool custom look. Super glue works great, especially for metal-on-metal gluing, and I think the brand we used was Gorilla glue. (BTW, please don't hurt yourself while attempting this, beware of sharp metal edges, etc.; customize at your own risk, both to yourself and to your guitar.)
If you want to use sheet metal, your hardware store may carry copper flashing with the roofing materials, or you can check your local craft store (we found the gears used here in the scrap-booking section, believe it or not). You can also use a cheap method Dale has previously used (with varied success) to create a new pick guard: buy an aluminum For Sale or Beware of Dog sign, turn it over and draw your design on the back, and carefully cut it out. Use your existing pick guard as a guide for drilling the screw holes, and sand it with a fine grit sandpaper to prevent getting cut by sharp edges.
Another idea is to visit a thrift store and look for interesting metal button pins (such as those with band names on them, skulls, or other cool graphics) or magnets. You can remove the pin from the back and glue them to your guitar, or use them to line your guitar strap. Or, send me a convo on Etsy if you'd like to purchase a disc with a custom phrase or name on it. Girls, look through your jewelry box for costume jewelry that you no longer wear, and see if anything could be used to give your guitar a little bling. The possibilities are endless!
So, back to the current project. Here is a stock photo of the guitar Dale wanted to steam, it's a Peavey PXD Void III that he has owned for about a year. You can find the instrument details on the Peavey website.
 The first thing we did was screw a copper bracket onto the pick guard and place various gears along the bracket and just underneath it, for a little visual interest. I'd like to add some moving gears to it at a later point, but for now these are fixed in place.

The next thing Dale did was remove the volume knobs and place copper washers underneath. I also wrapped copper wire around the tremolo.

Next, Dale removed the black washers under the tuning pegs and replaced them with copper ones. Since this was to be a custom guitar, I wanted to remove the shiny aluminum Void III logo on the head stock and replace it with one that was more fitting. I used the logo plate as a template and cut a new one out of 22g nickel silver, giving it a brushed finish with sandpaper to match the pick guard. I stamped the letter 'D' (Dale's initial) in the center, and Dale framed it with a copper gear. Here's a before and after of the head stock:


The last thing we did to the guitar was a surprise that I made for Dale. He loves the look of iron crosses, and has added them to several of his other guitars. So while he was out, I cut an iron cross out of a 22g copper sheet with my jewelry saw and a pair of tin snips. I hand stamped the lyrics to one of his favorite songs (Cemetery Gates by Pantera) into the cross, using various fonts for a more interesting look. I hammered the edges and aged it with liver of sulfur, sanding it down for an antiqued look.

Luckily, he loved the finished product, and it took its place on the guitar, filling out a previously empty spot.
Here is the (for now) completed guitar. We are throwing around ideas to customize the actual body and make it a true Steampunk guitar, and I'll update with pictures when we make those changes, but for now it has a pretty sweet custom look that was easy and inexpensive to do. Good luck with your customizations, and feel free to leave a comment or post a picture link of your own customized guitar.


We haven't made any major changes to the body of the guitar yet, but the cosmetic changes we've made have made the guitar a bit more interesting already. The cool thing is, most of the things we've done here can be repeated on your own guitar to give it a one-of-a-kind appearance. All you need is a little creativity and imagination.
The main thing we used were copper washers and wire, available at any hardware store. While you're there, look around and see if anything else catches your eye. There are so many different items on the shelves that can be altered (or even used as-is) to create a cool custom look. Super glue works great, especially for metal-on-metal gluing, and I think the brand we used was Gorilla glue. (BTW, please don't hurt yourself while attempting this, beware of sharp metal edges, etc.; customize at your own risk, both to yourself and to your guitar.)
If you want to use sheet metal, your hardware store may carry copper flashing with the roofing materials, or you can check your local craft store (we found the gears used here in the scrap-booking section, believe it or not). You can also use a cheap method Dale has previously used (with varied success) to create a new pick guard: buy an aluminum For Sale or Beware of Dog sign, turn it over and draw your design on the back, and carefully cut it out. Use your existing pick guard as a guide for drilling the screw holes, and sand it with a fine grit sandpaper to prevent getting cut by sharp edges.
Another idea is to visit a thrift store and look for interesting metal button pins (such as those with band names on them, skulls, or other cool graphics) or magnets. You can remove the pin from the back and glue them to your guitar, or use them to line your guitar strap. Or, send me a convo on Etsy if you'd like to purchase a disc with a custom phrase or name on it. Girls, look through your jewelry box for costume jewelry that you no longer wear, and see if anything could be used to give your guitar a little bling. The possibilities are endless!
So, back to the current project. Here is a stock photo of the guitar Dale wanted to steam, it's a Peavey PXD Void III that he has owned for about a year. You can find the instrument details on the Peavey website.

The next thing Dale did was remove the volume knobs and place copper washers underneath. I also wrapped copper wire around the tremolo.

Next, Dale removed the black washers under the tuning pegs and replaced them with copper ones. Since this was to be a custom guitar, I wanted to remove the shiny aluminum Void III logo on the head stock and replace it with one that was more fitting. I used the logo plate as a template and cut a new one out of 22g nickel silver, giving it a brushed finish with sandpaper to match the pick guard. I stamped the letter 'D' (Dale's initial) in the center, and Dale framed it with a copper gear. Here's a before and after of the head stock:
The last thing we did to the guitar was a surprise that I made for Dale. He loves the look of iron crosses, and has added them to several of his other guitars. So while he was out, I cut an iron cross out of a 22g copper sheet with my jewelry saw and a pair of tin snips. I hand stamped the lyrics to one of his favorite songs (Cemetery Gates by Pantera) into the cross, using various fonts for a more interesting look. I hammered the edges and aged it with liver of sulfur, sanding it down for an antiqued look.

Luckily, he loved the finished product, and it took its place on the guitar, filling out a previously empty spot.
Here is the (for now) completed guitar. We are throwing around ideas to customize the actual body and make it a true Steampunk guitar, and I'll update with pictures when we make those changes, but for now it has a pretty sweet custom look that was easy and inexpensive to do. Good luck with your customizations, and feel free to leave a comment or post a picture link of your own customized guitar.


Thursday, April 15, 2010
Just an update
It's been a few days since I've written an entry. I've been very tired this past week, as I've been trying to get over a cold and taking care of Caoimhe who has been sick too. Craft-wise, I have been semi-busy. I haven't gotten the chance to use my torch again yet, which I'm looking forward to doing because I have a new ring idea I want to try. I've just been stamping jewelry and wrapping beads at my workbench, for the most part. I've started making some Mother's Day pendants that I will list in my store next week. They will be pre-made and ready to ship. I also made a necklace for my grandmother, who is turning 75 tomorrow. I stamped her name on a sterling silver raised edge square pendant (available in my store) and added an acrylic flower, Swarovski crystal, and glass bead for a little embellishment. Unfortunately I wasn't able to take pictures before I wrapped her gift, but I will have a listing up soon that includes the flower beads. I think they are going to be a popular item.
Have a great weekend,
-Nickie
Have a great weekend,
-Nickie
Friday, April 9, 2010
The First Ring For Sale, and My New Toy
First, I am excited because I bought a new toy today. Instead of the $15 micro soldering torch I have been using (which blew out repeatedly at crucial moments during brazing) I am now the proud owner of an oxygen/propylene torch! Yayyyyy! I feel like an actual metalworker now, like I finally got my wings, so to speak. I used it today to finish a ring that I wasn't able to complete with the microtorch since I could never get it hot enough to work on copper. It is still a little intimidating but I can't wait to use it again - soldering is SO easy now, it's crazy. I forgot to take a picture of the copper ring I made (I gave it to Dale already) but I'll take pictures tomorrow and post them on here soon.
Speaking of rings, the very first ring ever for sale in my store is now listed! It's a more elegant version of my Sleeping Beauty ring, as it features fancy scroll stamps on either side of the garnet and I also stamped a tiny secret heart on the inside of the band. The ring is a delicate size 4.5 and fits so wonderfully on my pinky finger. It is already so hard to part with my creations, but this ring is special to me because it is exactly the ring I have always dreamed of but never could find anything similar. I almost hope nobody buys it so that I can give it to Caoimhe. I will have to make another one just for her sometime.
Well, thanks for reading, I'm off to bed - enjoy your weekend!

*** You can find the new Sleeping Beauty ring for sale in my store here: http://www.etsy.com/view_listing.php?listing_id=44485665 ***


Monday, April 5, 2010
Sleeping Beauty
I'm sleepy tonight (it's after midnight already) and I have a sore throat, so I'm not feeling so good right now. But I wanted to share a picture of a ring I made today, because I am very proud of how it has turned out. It is the first silver band ring I have made, and the second I have attempted with a bezel set gemstone. It's also the first ring I've made that was nice enough to sign (it has a CL stamp on the inside, for Caoimhe Lily) and I also roughly stamped it with .925 to show the silver content.

I chose a natural garnet as the centerpiece, for its lovely dark red color. It can look almost black in certain lighting, and in front of a bright light the red is a perfect shade of scarlet. I decided to go with a lightly brushed, lightly antiqued sterling silver band, for a simple yet elegant look. The garnet is in a raised bezel setting which makes the gem appear larger than it is, and it is delicately wrapped in a cushion of gallery wire that reminds me of delicate upside-down hearts. It looks very princess-y to me, like something Snow White would wear on her ring finger. Such a dainty little thing, yet the color is bold and it almost looks like a single drop of blood is framed here in silver - maybe it was the single drop that fell from Sleeping Beauty's finger as it was pricked by the spinning wheel? Hmm, Sleeping Beauty, what a lovely name for a ring! I'm not sure I'll be able to part with this one anytime soon, but I wanted to share it with you because you will probably see a similar one in my shop sometime soon.
I'm off to bed now. More tomorrow...


Wednesday, March 31, 2010
Ashton's Cross-Time InfluXuator
There is a very special place in my heart for Steampunk artifacts. If you're not familiar with the term, Steampunk is a unique mixture of science fiction and creative anachronisms; it's a way of using various media to produce items which are fictional mechanical inventions or technology appearing at an earlier date. Imagine how a computer might have looked if it were invented in the Victorian era, or a steam-powered shotgun. Exciting, right?
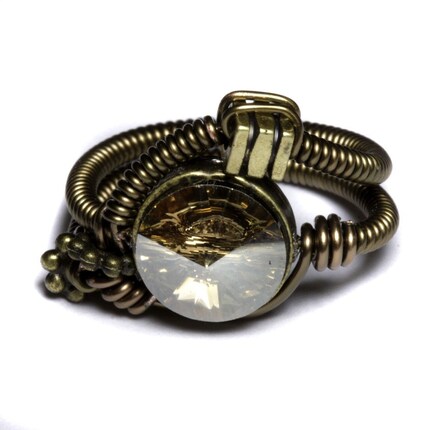
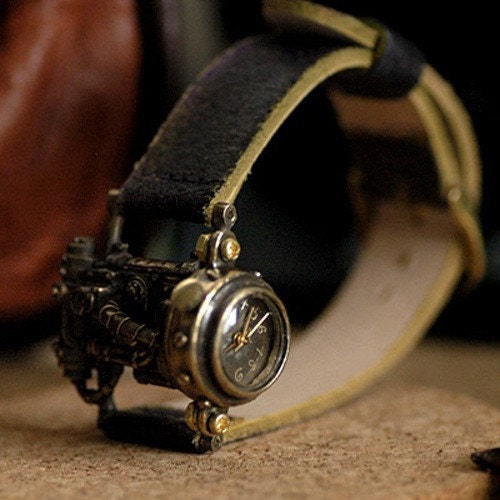
There's a whole sub-culture of steam lovers out there, and although I'm not into role-playing or dressing up as an air pirate, I do love a good piece of jewelry. Some pieces I personally own (and I love to give credit where it is due) are this gorgeous brass ring from Catherinette Rings, made by the very talented Daniel Proulx, and this amazing handcrafted watch by Marrianne:
So of course, once I am more experienced in metalworking, I dream of making similarly beautiful items.
Tonight, my son Ashton helped me create a fun little pendant that I think turned out to be pretty cool. The pendant is a "Cross-Time InfluXuator" and is used for personal time travel. Unfortunately it is broken, so the wearer (sent from the year 1884) is permanently stuck in the present day. On the back is stamped: "If found please return to Doktor Chrono." Ash helped come up with the names, he is so inventive.


The pendant is made of copper, with a nickel silver disc inside. The nickel disc was originally supposed to spin around to display several different dates, but unfortunately it didn't work out that way. I riveted the discs together, but although I put a piece of cardboard in between the pieces to allow movement after riveting, they were still hammered too closely and the piece did not spin. As I was trying to loosen it a bit with a pair of pliers, the sharp edge of the metal sliced my thumb wide open. It didn't help that my fingers were filthy with metal shavings and god knows what else from my workbench. After cleaning my thumb with peroxide and neosporin, and covering it with a bandage, I sat back down and decided to just glue the parts together and be done with it.
Then Ash decided it didn't look enough like a time machine, so I twisted a bit of wire and added it to the circumference. I also pierced a hole in a metal gear I snatched from my hubby's miscellany drawer and added it to the pendant to give it more of a steampunk look. Altogether, I think it looks pretty cool. Now that I have a little experience in what to do (and especially what NOT to do) to make a pendant like this, I might try another one sometime. I'd like to add a few extra components and get the inside disc to spin next time around, too.
For now, enjoy these lovely sepia pics of the wonderful X-Time Influxuator that Ash and I made:


Subscribe to:
Posts (Atom)