Congratulations to Patricia who is the winner of the first official Caoimhe Lily giveaway!
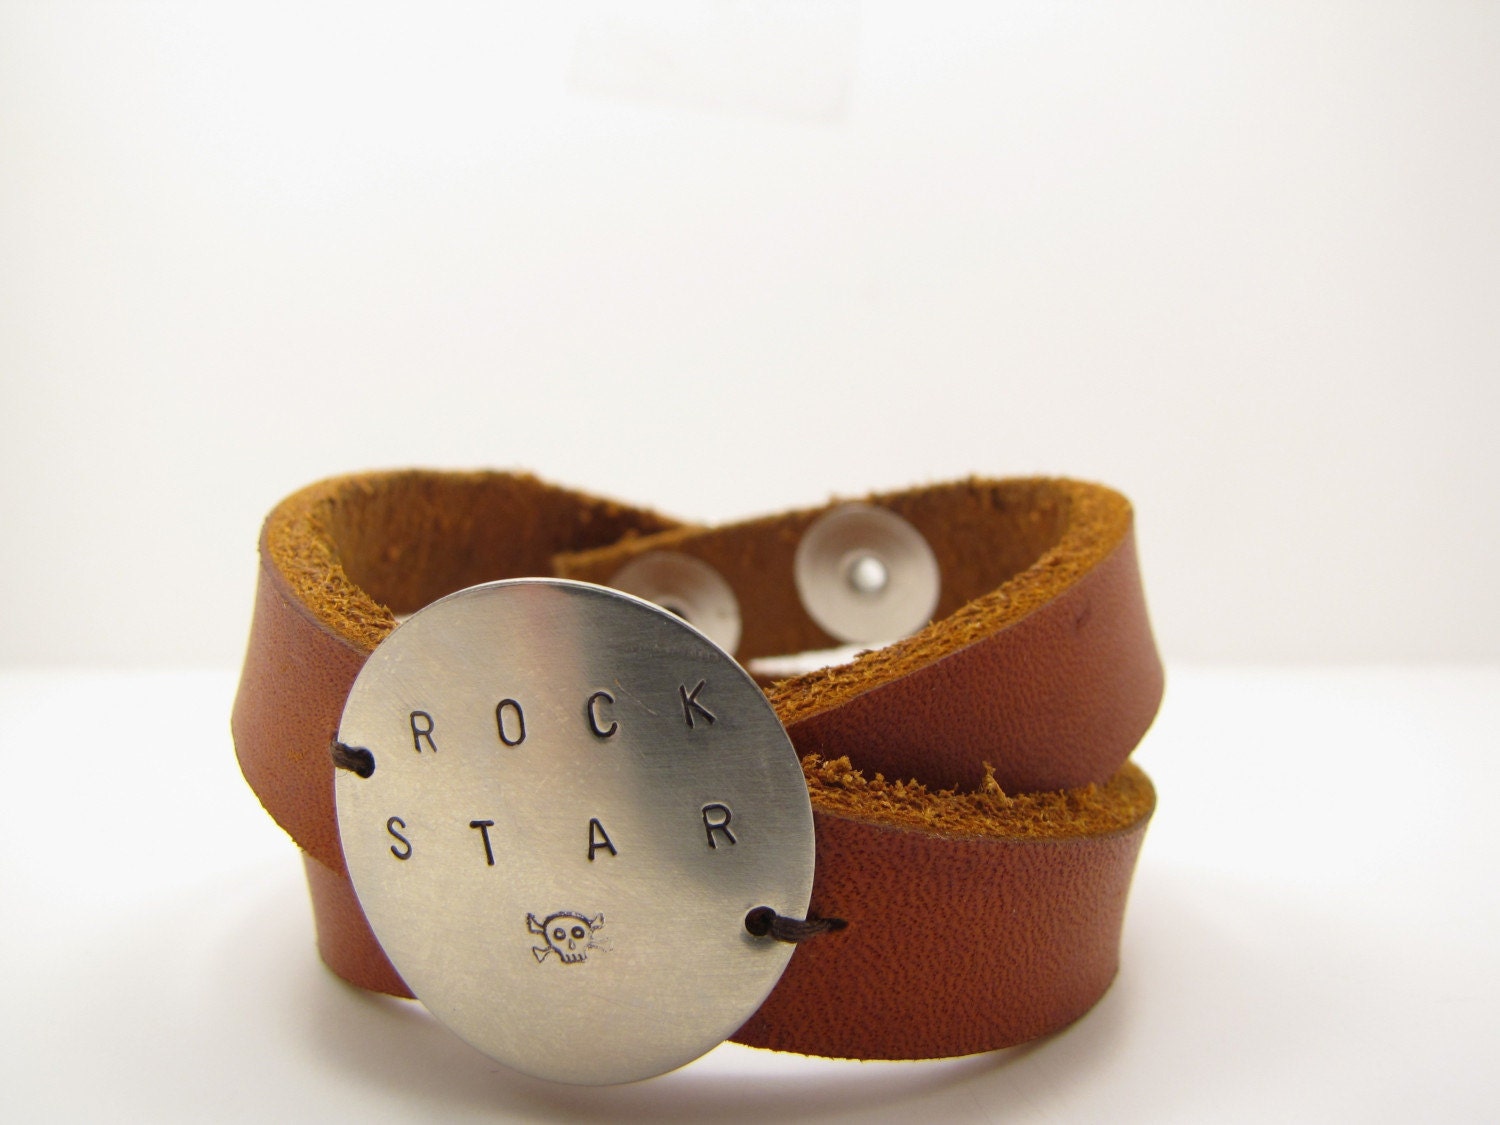
Patricia was the 22nd person to become a fan of the Caoimhe Lily page on Facebook. Her name was chosen by a random number generator on Random.org. Her prize is a beautiful hand crafted copper bracelet, personalized with the name of her choice. Patricia, please message me by Saturday, June 5, to claim your prize!
If you didn't win this time, don't worry - there will be more contests and giveaways to come. Stay tuned to my Facebook page, and you can also follow my blog to stay informed of special deals and new items.
Also, remember that Facebook fans will receive 10% off of their orders throughout June with the coupon code FACEBOOK, so if you have your eye on a bracelet like the one Patricia has won, or a custom personalized necklace, now is a great time to make your purchase.
Thanks again, everyone!
~Nickie
*EDIT: Patricia has decided to forfeit her prize, and a runner-up has been chosen. Congrats to entrant #3, Casey S.!

Showing posts with label copper. Show all posts
Showing posts with label copper. Show all posts
Thursday, June 3, 2010

Wednesday, June 2, 2010
Giveaway #1 - Personalized Hand Crafted Copper Bracelet
Who wants free jewelry? I know you do!
I'm holding a giveaway on my new Facebook page - and you could be the lucky winner! Click on the Like button on my Facebook page, and then suggest my page to your friends. When I reach 50+ fans, I will choose one lucky person at random to win a free handmade copper bracelet, personalized with their name and any of my design stamps.

You can become a fan and be eligible for the giveaway by clicking on the Like button on my page here: Become a Fan of Caoimhe Lily on Facebook
Good luck, everyone!
I'm holding a giveaway on my new Facebook page - and you could be the lucky winner! Click on the Like button on my Facebook page, and then suggest my page to your friends. When I reach 50+ fans, I will choose one lucky person at random to win a free handmade copper bracelet, personalized with their name and any of my design stamps.

You can become a fan and be eligible for the giveaway by clicking on the Like button on my page here: Become a Fan of Caoimhe Lily on Facebook
Good luck, everyone!
Tuesday, April 20, 2010
Customizing Your Guitar - cheap and easy ideas
As you may know from a previous post, I am in love with all things Steampunk. My husband Dale is a musician, and he fell in love with the style when I showed him various guitars online that had been steampunked. He has several guitars in his collection, and has wanted to steam one of them for a long while now. So we've been keeping an eye out for parts, and began the first phase of customization a few days ago.
We haven't made any major changes to the body of the guitar yet, but the cosmetic changes we've made have made the guitar a bit more interesting already. The cool thing is, most of the things we've done here can be repeated on your own guitar to give it a one-of-a-kind appearance. All you need is a little creativity and imagination.
The main thing we used were copper washers and wire, available at any hardware store. While you're there, look around and see if anything else catches your eye. There are so many different items on the shelves that can be altered (or even used as-is) to create a cool custom look. Super glue works great, especially for metal-on-metal gluing, and I think the brand we used was Gorilla glue. (BTW, please don't hurt yourself while attempting this, beware of sharp metal edges, etc.; customize at your own risk, both to yourself and to your guitar.)
If you want to use sheet metal, your hardware store may carry copper flashing with the roofing materials, or you can check your local craft store (we found the gears used here in the scrap-booking section, believe it or not). You can also use a cheap method Dale has previously used (with varied success) to create a new pick guard: buy an aluminum For Sale or Beware of Dog sign, turn it over and draw your design on the back, and carefully cut it out. Use your existing pick guard as a guide for drilling the screw holes, and sand it with a fine grit sandpaper to prevent getting cut by sharp edges.
Another idea is to visit a thrift store and look for interesting metal button pins (such as those with band names on them, skulls, or other cool graphics) or magnets. You can remove the pin from the back and glue them to your guitar, or use them to line your guitar strap. Or, send me a convo on Etsy if you'd like to purchase a disc with a custom phrase or name on it. Girls, look through your jewelry box for costume jewelry that you no longer wear, and see if anything could be used to give your guitar a little bling. The possibilities are endless!
So, back to the current project. Here is a stock photo of the guitar Dale wanted to steam, it's a Peavey PXD Void III that he has owned for about a year. You can find the instrument details on the Peavey website.
 The first thing we did was screw a copper bracket onto the pick guard and place various gears along the bracket and just underneath it, for a little visual interest. I'd like to add some moving gears to it at a later point, but for now these are fixed in place.

The next thing Dale did was remove the volume knobs and place copper washers underneath. I also wrapped copper wire around the tremolo.

Next, Dale removed the black washers under the tuning pegs and replaced them with copper ones. Since this was to be a custom guitar, I wanted to remove the shiny aluminum Void III logo on the head stock and replace it with one that was more fitting. I used the logo plate as a template and cut a new one out of 22g nickel silver, giving it a brushed finish with sandpaper to match the pick guard. I stamped the letter 'D' (Dale's initial) in the center, and Dale framed it with a copper gear. Here's a before and after of the head stock:


The last thing we did to the guitar was a surprise that I made for Dale. He loves the look of iron crosses, and has added them to several of his other guitars. So while he was out, I cut an iron cross out of a 22g copper sheet with my jewelry saw and a pair of tin snips. I hand stamped the lyrics to one of his favorite songs (Cemetery Gates by Pantera) into the cross, using various fonts for a more interesting look. I hammered the edges and aged it with liver of sulfur, sanding it down for an antiqued look.

Luckily, he loved the finished product, and it took its place on the guitar, filling out a previously empty spot.
Here is the (for now) completed guitar. We are throwing around ideas to customize the actual body and make it a true Steampunk guitar, and I'll update with pictures when we make those changes, but for now it has a pretty sweet custom look that was easy and inexpensive to do. Good luck with your customizations, and feel free to leave a comment or post a picture link of your own customized guitar.


We haven't made any major changes to the body of the guitar yet, but the cosmetic changes we've made have made the guitar a bit more interesting already. The cool thing is, most of the things we've done here can be repeated on your own guitar to give it a one-of-a-kind appearance. All you need is a little creativity and imagination.
The main thing we used were copper washers and wire, available at any hardware store. While you're there, look around and see if anything else catches your eye. There are so many different items on the shelves that can be altered (or even used as-is) to create a cool custom look. Super glue works great, especially for metal-on-metal gluing, and I think the brand we used was Gorilla glue. (BTW, please don't hurt yourself while attempting this, beware of sharp metal edges, etc.; customize at your own risk, both to yourself and to your guitar.)
If you want to use sheet metal, your hardware store may carry copper flashing with the roofing materials, or you can check your local craft store (we found the gears used here in the scrap-booking section, believe it or not). You can also use a cheap method Dale has previously used (with varied success) to create a new pick guard: buy an aluminum For Sale or Beware of Dog sign, turn it over and draw your design on the back, and carefully cut it out. Use your existing pick guard as a guide for drilling the screw holes, and sand it with a fine grit sandpaper to prevent getting cut by sharp edges.
Another idea is to visit a thrift store and look for interesting metal button pins (such as those with band names on them, skulls, or other cool graphics) or magnets. You can remove the pin from the back and glue them to your guitar, or use them to line your guitar strap. Or, send me a convo on Etsy if you'd like to purchase a disc with a custom phrase or name on it. Girls, look through your jewelry box for costume jewelry that you no longer wear, and see if anything could be used to give your guitar a little bling. The possibilities are endless!
So, back to the current project. Here is a stock photo of the guitar Dale wanted to steam, it's a Peavey PXD Void III that he has owned for about a year. You can find the instrument details on the Peavey website.


The next thing Dale did was remove the volume knobs and place copper washers underneath. I also wrapped copper wire around the tremolo.

Next, Dale removed the black washers under the tuning pegs and replaced them with copper ones. Since this was to be a custom guitar, I wanted to remove the shiny aluminum Void III logo on the head stock and replace it with one that was more fitting. I used the logo plate as a template and cut a new one out of 22g nickel silver, giving it a brushed finish with sandpaper to match the pick guard. I stamped the letter 'D' (Dale's initial) in the center, and Dale framed it with a copper gear. Here's a before and after of the head stock:

The last thing we did to the guitar was a surprise that I made for Dale. He loves the look of iron crosses, and has added them to several of his other guitars. So while he was out, I cut an iron cross out of a 22g copper sheet with my jewelry saw and a pair of tin snips. I hand stamped the lyrics to one of his favorite songs (Cemetery Gates by Pantera) into the cross, using various fonts for a more interesting look. I hammered the edges and aged it with liver of sulfur, sanding it down for an antiqued look.

Luckily, he loved the finished product, and it took its place on the guitar, filling out a previously empty spot.
Here is the (for now) completed guitar. We are throwing around ideas to customize the actual body and make it a true Steampunk guitar, and I'll update with pictures when we make those changes, but for now it has a pretty sweet custom look that was easy and inexpensive to do. Good luck with your customizations, and feel free to leave a comment or post a picture link of your own customized guitar.


Wednesday, March 31, 2010
Ashton's Cross-Time InfluXuator
There is a very special place in my heart for Steampunk artifacts. If you're not familiar with the term, Steampunk is a unique mixture of science fiction and creative anachronisms; it's a way of using various media to produce items which are fictional mechanical inventions or technology appearing at an earlier date. Imagine how a computer might have looked if it were invented in the Victorian era, or a steam-powered shotgun. Exciting, right?
There's a whole sub-culture of steam lovers out there, and although I'm not into role-playing or dressing up as an air pirate, I do love a good piece of jewelry. Some pieces I personally own (and I love to give credit where it is due) are this gorgeous brass ring from Catherinette Rings, made by the very talented Daniel Proulx, and this amazing handcrafted watch by Marrianne:


So of course, once I am more experienced in metalworking, I dream of making similarly beautiful items.
Tonight, my son Ashton helped me create a fun little pendant that I think turned out to be pretty cool. The pendant is a "Cross-Time InfluXuator" and is used for personal time travel. Unfortunately it is broken, so the wearer (sent from the year 1884) is permanently stuck in the present day. On the back is stamped: "If found please return to Doktor Chrono." Ash helped come up with the names, he is so inventive.


The pendant is made of copper, with a nickel silver disc inside. The nickel disc was originally supposed to spin around to display several different dates, but unfortunately it didn't work out that way. I riveted the discs together, but although I put a piece of cardboard in between the pieces to allow movement after riveting, they were still hammered too closely and the piece did not spin. As I was trying to loosen it a bit with a pair of pliers, the sharp edge of the metal sliced my thumb wide open. It didn't help that my fingers were filthy with metal shavings and god knows what else from my workbench. After cleaning my thumb with peroxide and neosporin, and covering it with a bandage, I sat back down and decided to just glue the parts together and be done with it.
Then Ash decided it didn't look enough like a time machine, so I twisted a bit of wire and added it to the circumference. I also pierced a hole in a metal gear I snatched from my hubby's miscellany drawer and added it to the pendant to give it more of a steampunk look. Altogether, I think it looks pretty cool. Now that I have a little experience in what to do (and especially what NOT to do) to make a pendant like this, I might try another one sometime. I'd like to add a few extra components and get the inside disc to spin next time around, too.
For now, enjoy these lovely sepia pics of the wonderful X-Time Influxuator that Ash and I made:


There's a whole sub-culture of steam lovers out there, and although I'm not into role-playing or dressing up as an air pirate, I do love a good piece of jewelry. Some pieces I personally own (and I love to give credit where it is due) are this gorgeous brass ring from Catherinette Rings, made by the very talented Daniel Proulx, and this amazing handcrafted watch by Marrianne:
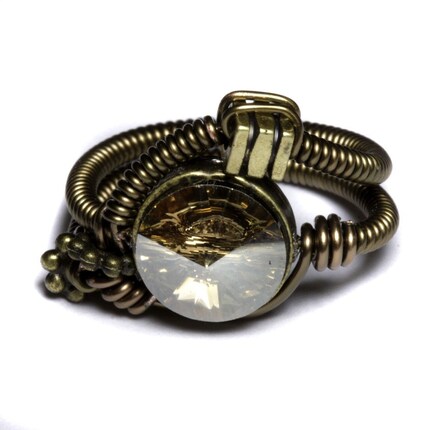
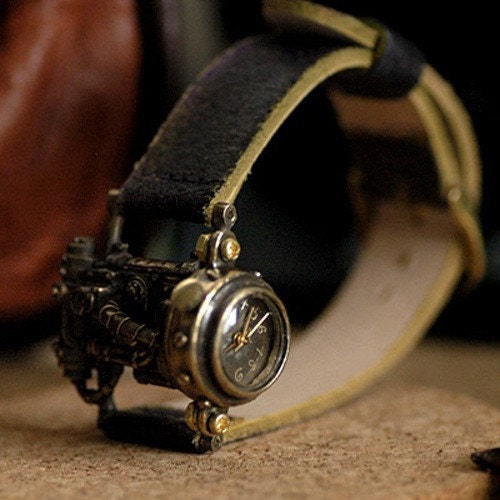
So of course, once I am more experienced in metalworking, I dream of making similarly beautiful items.
Tonight, my son Ashton helped me create a fun little pendant that I think turned out to be pretty cool. The pendant is a "Cross-Time InfluXuator" and is used for personal time travel. Unfortunately it is broken, so the wearer (sent from the year 1884) is permanently stuck in the present day. On the back is stamped: "If found please return to Doktor Chrono." Ash helped come up with the names, he is so inventive.


The pendant is made of copper, with a nickel silver disc inside. The nickel disc was originally supposed to spin around to display several different dates, but unfortunately it didn't work out that way. I riveted the discs together, but although I put a piece of cardboard in between the pieces to allow movement after riveting, they were still hammered too closely and the piece did not spin. As I was trying to loosen it a bit with a pair of pliers, the sharp edge of the metal sliced my thumb wide open. It didn't help that my fingers were filthy with metal shavings and god knows what else from my workbench. After cleaning my thumb with peroxide and neosporin, and covering it with a bandage, I sat back down and decided to just glue the parts together and be done with it.
Then Ash decided it didn't look enough like a time machine, so I twisted a bit of wire and added it to the circumference. I also pierced a hole in a metal gear I snatched from my hubby's miscellany drawer and added it to the pendant to give it more of a steampunk look. Altogether, I think it looks pretty cool. Now that I have a little experience in what to do (and especially what NOT to do) to make a pendant like this, I might try another one sometime. I'd like to add a few extra components and get the inside disc to spin next time around, too.
For now, enjoy these lovely sepia pics of the wonderful X-Time Influxuator that Ash and I made:


Monday, March 29, 2010
My first ring attempts
This past week I have been trying to do several things at once. I have had a few orders to make, and I'm working on that Aquatic Challenge piece also. This morning, I stamped two sterling silver discs with Ashton and Caoimhe's names using my new typewriter font stamps, to photograph for a new listing on Etsy. (One of the perks of making jewelry, is that I can keep all the demos for myself and Caoimhe, yay!)
But the main thing I'm focusing on right now is learning to solder well with my torch, and making rings. I've been majorly inspired by a woman named Clarity who makes the most awesome rings for her Etsy store, and I won't be happy until I can make such beautiful things myself. So I have made a few attempts at ring making, although my ring mandrel hasn't arrived yet (it should be delivered this week).
They do have their flaws, but they aren't bad considering they are my first attempts and I'm just learning as I go, with no formal training. I've already learned a lot while making them (mostly from having to go back and fix the mistakes, lol). For example, I made this copper wire ring first (above). I actually used what I think may be a tire iron to help bend it into shape. I hammered the ends of the copper wire, and I like the way they look but I now know that I need to file and sand them smooth before shaping the ring because if I do that part last it is hard to file without the rest of the ring getting in the way. They didn't get completely smooth, so there are shadows in the pictures that look bad even though it is much less noticeable in person. I made the silver ball by melting a scrap piece of silver that I had lying around., and I really like the way it stands out, all shiny and round, so I will probably be making more with this feature. It took a few tries to shape the silver into a perfect ball, so that was a learning experience too.


I made this solid copper band for my husband Dale, to fit on his pointer finger and replace an old ring that he wore but didn't much care for. Not having a mandrel to size the ring, I had to use a measuring tape to measure his old ring, then I cut a strip of copper in the same size and filed it down. I found that one of the metal punches in my punch & die set was the same diameter of his ring, so I used it to shape the copper strip. After soldering it together, I realized that I didn't file the ends well enough, although I thought I had done so. I know now that the edges must be very straight and touch together completely before soldering, in order to join them perfectly. I think it still came out pretty well, there is an obvious seam but it is straight and the solder fills it throughout so it doesn't look messy. After the ring was finished, I used a file to lightly etch two rings near the edges of the band for a bit of added interest (you can barely see them in the picture). I think that it would be much easier to do this before soldering, while it is flat. I could probably make the lines a lot deeper that way.
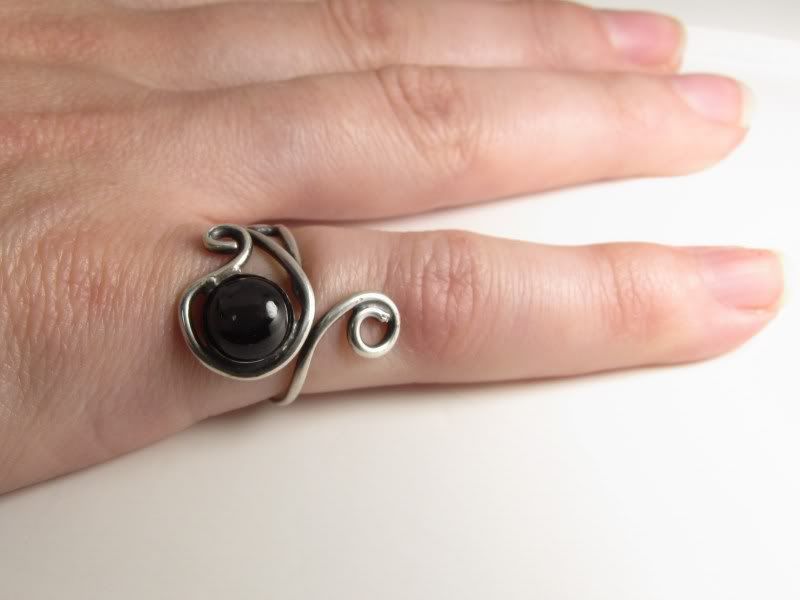
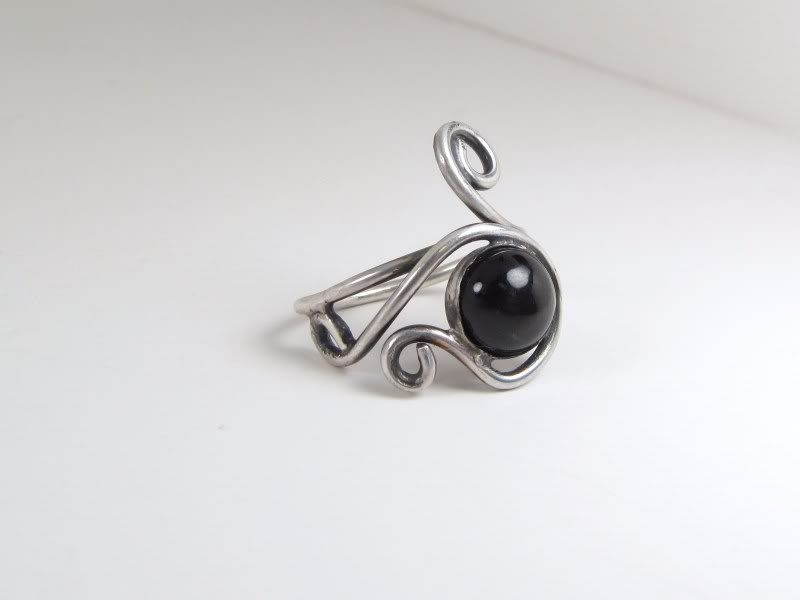
The last ring (pictured below), a sterling silver and black star diopside ring, was the biggest pain EVER. First, I was planning to use a rose quartz on this ring, but I kept dropping and losing the stones on my kitchen floor. Very annoying. I started out with a slightly different design in mind, but it evolved as I was making it. I did end up wasting a bit of silver wire though, bleh. The hardest thing about this ring was trying to solder the pieces together. The wind was blowing my wire and solder around, and blew out my torch on several occasions (I can't wait to get a new torch, mine sucks). Because the ring has an irregular shape, it was hard to get the pieces in the right position to solder them. Dale had the solution though: he brought me some rocks from the driveway, and I used them to prop the metal wire into the positions I needed. So all was good, until I overheated the metal and a previously soldered piece melted. As it did, the wire slipped out of place, then the solder cooled and I now had a hideously disfigured ring. This is where Dale suggested I take a break, because I was getting very frustrated at this point. I had to remelt the solder to free the wires from each other again, and start all over. Ugh. Anyway, I finally got it right, and I think it ended up looking pretty cool. I did a pretty good job of soldering the joints this time around, they looked nice when I was done. I had to file a few places down (mostly where the solder had accidentally melted the first time around) and so I learned about filing away solder, which I had never done before. Once the ring was done, I felt that the black star diopside fit the ring much better than the pink quartz. I used liver of sulfur to antique the silver, which made it look pretty cool in my opinion. You can't tell in the pictures here, but black star diopside gets its name from the way the light reflects off of needle-like inclusions in the stone. It forms a very rare 4-pointed star that shines beautifully off the black surface of the stone.

In all, I am pretty proud of my first set of rings. I won't be selling them, as I see way too many flaws in my technique that I need to correct first. But I am happy enough with them to wear them myself (again, perks of the job! lol), and one day when I am an experienced metalsmith I will look back at them and remember the trials and errors that taught me along the way.
But the main thing I'm focusing on right now is learning to solder well with my torch, and making rings. I've been majorly inspired by a woman named Clarity who makes the most awesome rings for her Etsy store, and I won't be happy until I can make such beautiful things myself. So I have made a few attempts at ring making, although my ring mandrel hasn't arrived yet (it should be delivered this week).
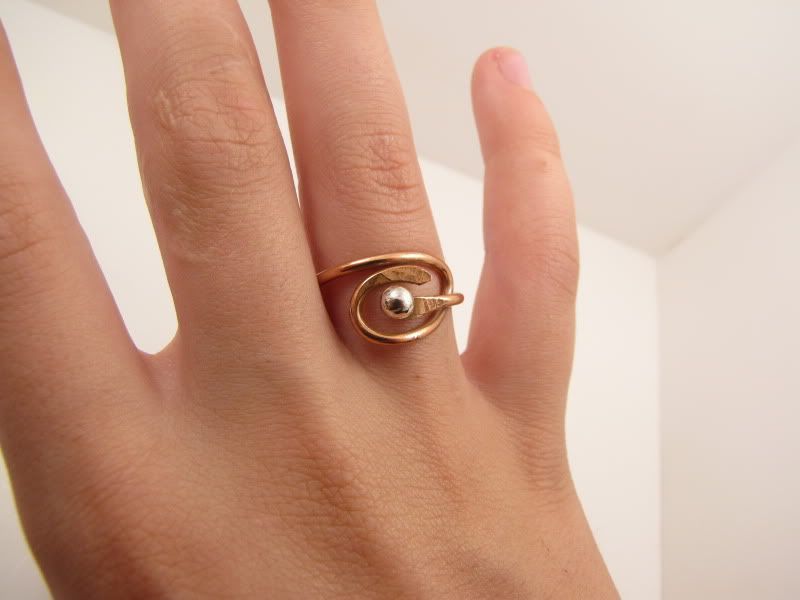
They do have their flaws, but they aren't bad considering they are my first attempts and I'm just learning as I go, with no formal training. I've already learned a lot while making them (mostly from having to go back and fix the mistakes, lol). For example, I made this copper wire ring first (above). I actually used what I think may be a tire iron to help bend it into shape. I hammered the ends of the copper wire, and I like the way they look but I now know that I need to file and sand them smooth before shaping the ring because if I do that part last it is hard to file without the rest of the ring getting in the way. They didn't get completely smooth, so there are shadows in the pictures that look bad even though it is much less noticeable in person. I made the silver ball by melting a scrap piece of silver that I had lying around., and I really like the way it stands out, all shiny and round, so I will probably be making more with this feature. It took a few tries to shape the silver into a perfect ball, so that was a learning experience too.
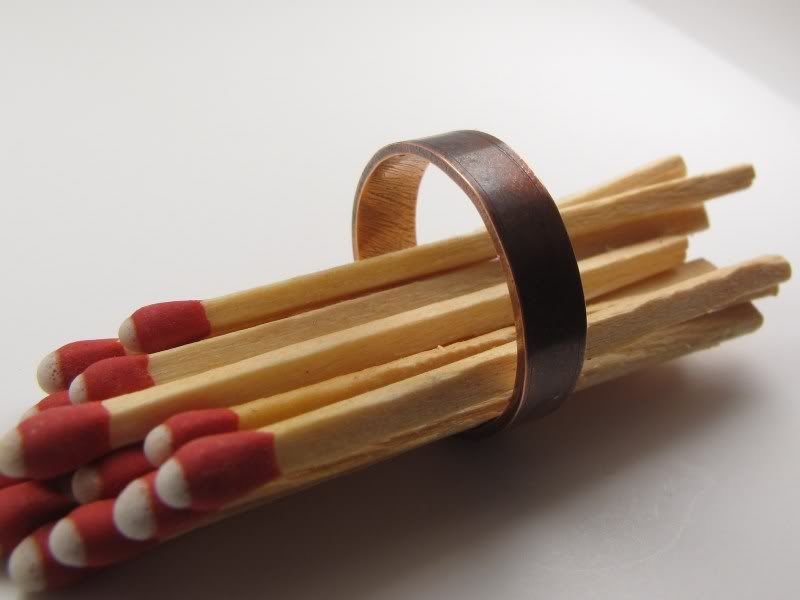
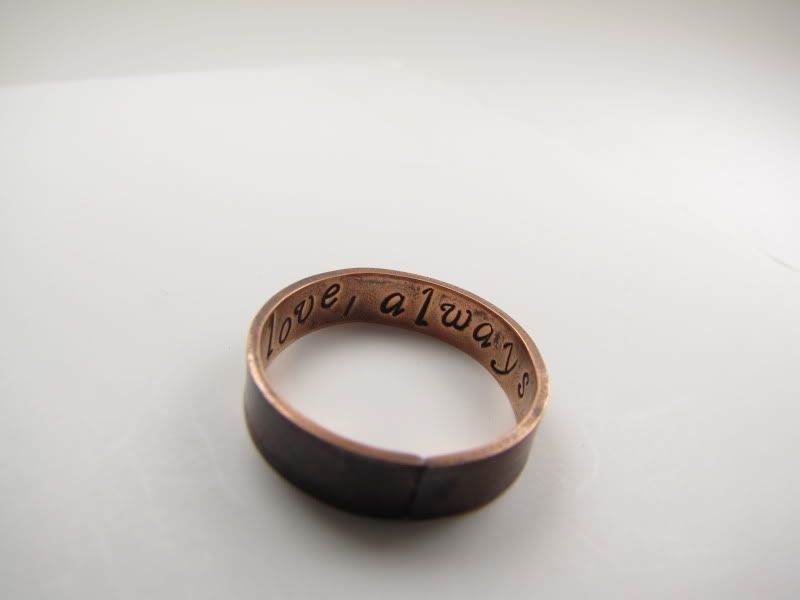
I made this solid copper band for my husband Dale, to fit on his pointer finger and replace an old ring that he wore but didn't much care for. Not having a mandrel to size the ring, I had to use a measuring tape to measure his old ring, then I cut a strip of copper in the same size and filed it down. I found that one of the metal punches in my punch & die set was the same diameter of his ring, so I used it to shape the copper strip. After soldering it together, I realized that I didn't file the ends well enough, although I thought I had done so. I know now that the edges must be very straight and touch together completely before soldering, in order to join them perfectly. I think it still came out pretty well, there is an obvious seam but it is straight and the solder fills it throughout so it doesn't look messy. After the ring was finished, I used a file to lightly etch two rings near the edges of the band for a bit of added interest (you can barely see them in the picture). I think that it would be much easier to do this before soldering, while it is flat. I could probably make the lines a lot deeper that way.
The last ring (pictured below), a sterling silver and black star diopside ring, was the biggest pain EVER. First, I was planning to use a rose quartz on this ring, but I kept dropping and losing the stones on my kitchen floor. Very annoying. I started out with a slightly different design in mind, but it evolved as I was making it. I did end up wasting a bit of silver wire though, bleh. The hardest thing about this ring was trying to solder the pieces together. The wind was blowing my wire and solder around, and blew out my torch on several occasions (I can't wait to get a new torch, mine sucks). Because the ring has an irregular shape, it was hard to get the pieces in the right position to solder them. Dale had the solution though: he brought me some rocks from the driveway, and I used them to prop the metal wire into the positions I needed. So all was good, until I overheated the metal and a previously soldered piece melted. As it did, the wire slipped out of place, then the solder cooled and I now had a hideously disfigured ring. This is where Dale suggested I take a break, because I was getting very frustrated at this point. I had to remelt the solder to free the wires from each other again, and start all over. Ugh. Anyway, I finally got it right, and I think it ended up looking pretty cool. I did a pretty good job of soldering the joints this time around, they looked nice when I was done. I had to file a few places down (mostly where the solder had accidentally melted the first time around) and so I learned about filing away solder, which I had never done before. Once the ring was done, I felt that the black star diopside fit the ring much better than the pink quartz. I used liver of sulfur to antique the silver, which made it look pretty cool in my opinion. You can't tell in the pictures here, but black star diopside gets its name from the way the light reflects off of needle-like inclusions in the stone. It forms a very rare 4-pointed star that shines beautifully off the black surface of the stone.
In all, I am pretty proud of my first set of rings. I won't be selling them, as I see way too many flaws in my technique that I need to correct first. But I am happy enough with them to wear them myself (again, perks of the job! lol), and one day when I am an experienced metalsmith I will look back at them and remember the trials and errors that taught me along the way.
Sunday, March 21, 2010
My Great Outdoor Crafting Day
Today was a GREAT crafting day. Dale took care of the kids all afternoon, and I wheeled my work bench outside to the porch, where I was able to make things all day long without interruption. It's not very often I get to do this (hell, I never do) so I really enjoyed it.
My charcoal block, flux, and various types of solder arrived yesterday, so I got to try my hand at soldering and brazing by myself for the first time today. (This was the main reason I went outside with it all, to keep the fumes out of the house.) Well, I had about an hour of preparation first. My copper solder is in the typical wire form, but the sterling silver solder is sold in sheets, so I had to cut the sheets into tiny little squares with a pair of heavy duty kitchen scissors. I bought two different types, hard and medium, which melt at different temperatures. So they have to be kept separate. I have a ton of empty baby food jars that I have kept stored away for just this type of thing, so I used two of them for storing the solder.
I also made what is called a "pickle" out of vinegar and salt, and put it in a different baby food jar. Pickle is used to remove the yucky black charred stuff from metal that has been heated. They sell various pickle solutions online, but I am all about using homemade things whenever possible. Not only does it save quite a bit of money in the long run, but it is safer than using harsh chemicals and more environmentally friendly as well.
So once the preparation was done, I was ready to make something. (I ended up with four projects, so this blog entry is going to be pretty long!) Yesterday, I had cut a piece of nickel silver into a star shape, and also cut out a copper rectangle that I stamped with stars and hammered around the edge. My first soldering project was to solder the star onto the rectangle. I dipped both of the pieces into a jar of flux (it prepares the metal and allows the solder to flow better) then placed the copper piece onto the charcoal block. I set a square of hard solder in the center, and put the star on top. Safety goggles, on! Torch lit, check! It took a while for me to adjust the flame correctly but I managed to successfully solder the two pieces together. However, they looked like a charred mess as I dropped them into the pickle, and ten minutes later it still looked like a half-charred mess. I decided to keep going, though.
I didn't know what I wanted to make next, so I looked in my scrap drawer and pulled out two copper circles. I cut them into arches, bent them around, and tried to envision what they could become. Didn't have much luck, lol. Then I decided I would make a little bird. I placed the two arches together for the body and tail, then cut 1/4th off of a scrap sterling silver disc and soldered it on as a wing, and also used scraps to make a little beak. My bird needed an eye though. I remembered a video I watched recently that showed someone melting silver into a ball, so I tried it and after a few tries I learned how to make a perfectly round ball with a flat bottom. I made a few of these out of scraps, soldered one onto the bird as an eye, and put the others aside for later. All the while, fluxing, soldering, pickling. Each piece looked so bad, I was convinced I was doing something horribly wrong. The silver balls were black with char and ash, and the copper turned different shades from purple to yellow to black. Yuck. Not to mention, my bird design was pretty crappy. I will admit it. And since I'm still learning to solder, I accidentally let it run all over the beak and cover the copper (oops!). But it's cute in it's own little way, damn it! I guess I just have a soft spot in my heart from all my little creations, ugly or otherwise.
Next I decided to make a ring out of copper. Last week I had made my first ring ever, out of a copper washer, but I wanted to try making one out of a piece of wire today. Dale had some old air conditioning wire that I stripped to get a large piece of copper wiring (yay for recycling!). I don't have a ring mandrel yet (I realllly want one of these but they're like $30 and out of my budget for the moment) so I used a weird iron pole that was in Dale's tool box. No clue what it is for (a tire iron, maybe?), but it is round and just a little larger around than my pointer finger so it worked. First I hammered the tip of the wire flat to add interest and get rid of the sharp edge, then began shaping it around the tire iron. I kind of did a free-form shape, trying to find a style that I liked. I made it wrap around then curl back on itself. Once I figured out the basic shape I wanted, I had to uncurl the wire and cut it to the right size, then hammer that end also. The unbending and rebending was hard, because wire tends to bend at a sharp angle and I had to keep reworking it to keep it round on all sides. Next, I selected one of the ugly black silver balls and soldered it onto one of the hammered ends of the ring. It turned out to be a cool design, but like the other things I made today, it looked like a pile of black junk. I was getting a little discouraged by this point.
My last project was to take the solid copper ring I previously had made, and solder a silver ball onto it as a focal point. At about this time, it began to rain and the wind started blowing my stuff around like crazy. I couldn't keep my torch lit and the air was so cold that the metal kept cooling while I tried to solder the ball onto the ring. I managed to get the solder to hold the ball onto the ring on one single side, and at this point I decided it was useless, and time to clean up and go inside.
Because I didn't want to give up on my yucky looking creations, I went ahead and threw them in the tumbler to polish them and try to get some of the yucky charred stuff off. I'm glad I did, because an hour or so later I took them out and WOW! They were perfectly clean and shiny as new. I knew my tumbler was awesome but didn't know it would take off everything the pickle left behind. What a relief, to know I have this wonderful machine that works miracles. The copper wire ring that I made turned out to be very pretty, I love this piece. When I showed Dale, he said, "Wow, you made this? You could probably sell this one for a lot of money" which was so nice to hear, because it was the first time he's been impressed by anything I've made. (He doesn't see the beauty in my ugly little darlings.) He teased me and said, "It's almost like you can make real jewelry!" lol. But I don't think I want to sell this one. It is the first pretty ring I have ever made, and it fits my finger perfectly. I think I will be keeping it. The pictures I took do not show it justice; although it is hammered in places it does not look dark or shadowy like in the pictures. It's very shiny and the silver ball really pops out at you.
So here are some pictures of the finished results, except for the solid ring which needs to be re-soldered on one side because the weather was too finicky today.
My ugly little birdy which serves no actual purpose:

I decided this one would make an awesome key chain:

My pretty copper & sterling silver ring:

My charcoal block, flux, and various types of solder arrived yesterday, so I got to try my hand at soldering and brazing by myself for the first time today. (This was the main reason I went outside with it all, to keep the fumes out of the house.) Well, I had about an hour of preparation first. My copper solder is in the typical wire form, but the sterling silver solder is sold in sheets, so I had to cut the sheets into tiny little squares with a pair of heavy duty kitchen scissors. I bought two different types, hard and medium, which melt at different temperatures. So they have to be kept separate. I have a ton of empty baby food jars that I have kept stored away for just this type of thing, so I used two of them for storing the solder.
I also made what is called a "pickle" out of vinegar and salt, and put it in a different baby food jar. Pickle is used to remove the yucky black charred stuff from metal that has been heated. They sell various pickle solutions online, but I am all about using homemade things whenever possible. Not only does it save quite a bit of money in the long run, but it is safer than using harsh chemicals and more environmentally friendly as well.
So once the preparation was done, I was ready to make something. (I ended up with four projects, so this blog entry is going to be pretty long!) Yesterday, I had cut a piece of nickel silver into a star shape, and also cut out a copper rectangle that I stamped with stars and hammered around the edge. My first soldering project was to solder the star onto the rectangle. I dipped both of the pieces into a jar of flux (it prepares the metal and allows the solder to flow better) then placed the copper piece onto the charcoal block. I set a square of hard solder in the center, and put the star on top. Safety goggles, on! Torch lit, check! It took a while for me to adjust the flame correctly but I managed to successfully solder the two pieces together. However, they looked like a charred mess as I dropped them into the pickle, and ten minutes later it still looked like a half-charred mess. I decided to keep going, though.
I didn't know what I wanted to make next, so I looked in my scrap drawer and pulled out two copper circles. I cut them into arches, bent them around, and tried to envision what they could become. Didn't have much luck, lol. Then I decided I would make a little bird. I placed the two arches together for the body and tail, then cut 1/4th off of a scrap sterling silver disc and soldered it on as a wing, and also used scraps to make a little beak. My bird needed an eye though. I remembered a video I watched recently that showed someone melting silver into a ball, so I tried it and after a few tries I learned how to make a perfectly round ball with a flat bottom. I made a few of these out of scraps, soldered one onto the bird as an eye, and put the others aside for later. All the while, fluxing, soldering, pickling. Each piece looked so bad, I was convinced I was doing something horribly wrong. The silver balls were black with char and ash, and the copper turned different shades from purple to yellow to black. Yuck. Not to mention, my bird design was pretty crappy. I will admit it. And since I'm still learning to solder, I accidentally let it run all over the beak and cover the copper (oops!). But it's cute in it's own little way, damn it! I guess I just have a soft spot in my heart from all my little creations, ugly or otherwise.
Next I decided to make a ring out of copper. Last week I had made my first ring ever, out of a copper washer, but I wanted to try making one out of a piece of wire today. Dale had some old air conditioning wire that I stripped to get a large piece of copper wiring (yay for recycling!). I don't have a ring mandrel yet (I realllly want one of these but they're like $30 and out of my budget for the moment) so I used a weird iron pole that was in Dale's tool box. No clue what it is for (a tire iron, maybe?), but it is round and just a little larger around than my pointer finger so it worked. First I hammered the tip of the wire flat to add interest and get rid of the sharp edge, then began shaping it around the tire iron. I kind of did a free-form shape, trying to find a style that I liked. I made it wrap around then curl back on itself. Once I figured out the basic shape I wanted, I had to uncurl the wire and cut it to the right size, then hammer that end also. The unbending and rebending was hard, because wire tends to bend at a sharp angle and I had to keep reworking it to keep it round on all sides. Next, I selected one of the ugly black silver balls and soldered it onto one of the hammered ends of the ring. It turned out to be a cool design, but like the other things I made today, it looked like a pile of black junk. I was getting a little discouraged by this point.
My last project was to take the solid copper ring I previously had made, and solder a silver ball onto it as a focal point. At about this time, it began to rain and the wind started blowing my stuff around like crazy. I couldn't keep my torch lit and the air was so cold that the metal kept cooling while I tried to solder the ball onto the ring. I managed to get the solder to hold the ball onto the ring on one single side, and at this point I decided it was useless, and time to clean up and go inside.
Because I didn't want to give up on my yucky looking creations, I went ahead and threw them in the tumbler to polish them and try to get some of the yucky charred stuff off. I'm glad I did, because an hour or so later I took them out and WOW! They were perfectly clean and shiny as new. I knew my tumbler was awesome but didn't know it would take off everything the pickle left behind. What a relief, to know I have this wonderful machine that works miracles. The copper wire ring that I made turned out to be very pretty, I love this piece. When I showed Dale, he said, "Wow, you made this? You could probably sell this one for a lot of money" which was so nice to hear, because it was the first time he's been impressed by anything I've made. (He doesn't see the beauty in my ugly little darlings.) He teased me and said, "It's almost like you can make real jewelry!" lol. But I don't think I want to sell this one. It is the first pretty ring I have ever made, and it fits my finger perfectly. I think I will be keeping it. The pictures I took do not show it justice; although it is hammered in places it does not look dark or shadowy like in the pictures. It's very shiny and the silver ball really pops out at you.
So here are some pictures of the finished results, except for the solid ring which needs to be re-soldered on one side because the weather was too finicky today.
My ugly little birdy which serves no actual purpose:

I decided this one would make an awesome key chain:

My pretty copper & sterling silver ring:

Friday, March 19, 2010
What I've been up to lately - a.k.a. what's in my Etsy store
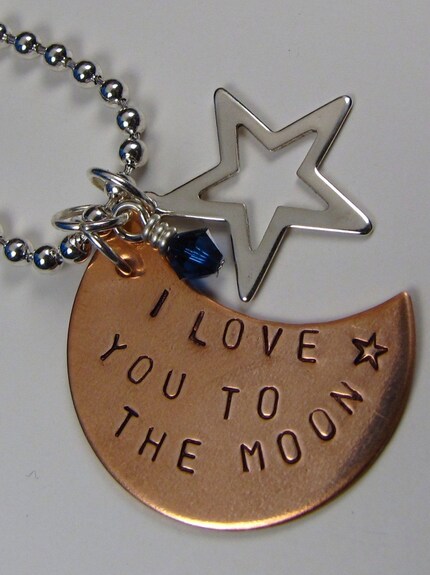 Just popping in to post a few pics. These are some items that I have made recently. They're a little better than the items I first began stamping. The lettering is straighter, and at least in my humble opinion the designs are beginning to get a little more interesting. Also, more as a reminder to myself, I have a few new items I plan on posting to Etsy tomorrow. I will do my best to remember to post pics of them here as well.
I'm especially excited that I was able to make a custom necklace for my mother's step-granddaughter Alexis. It was a pain to make (I broke the first rule of metalworking: Never put a mark on the metal that you don't want there). The sterling silver had a few scratches on the surface, so I used a piece of sandpaper, but accidentally used 220 grit sandpaper instead of 440. It left little scratches all over the metal! All I could do was to sand the whole piece equally, then tumble it in my polisher. I usually tumble the pieces for about two hours, but had to leave this pendant in for twice as long. At least it turned out nice and shiny in the end, thankfully!
Oh, and lest I forget to mention: My jeweler's saw has arrived! YAY! I have already used it to cut a few squares from a sheet of nickel silver. I used them to make my "He loves me, he loves me not" pendant necklace. It's a cute little item, and I'm posting a pic of it here along with a few others. Now all that is left to be delivered are my flux and solder, and the most important piece of all: a charcoal block. This will allow me to finally use my torch to fuse and braze the metal. (Brazing is just a fancy technical term for soldering fine metals such as sterling silver or gold). This, ladies and gentlemen, is the moment I have been waiting for. I'll let you know when it all arrives, of course!
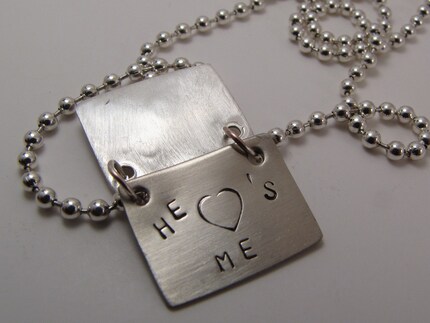
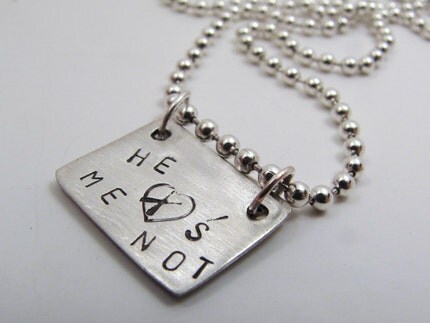
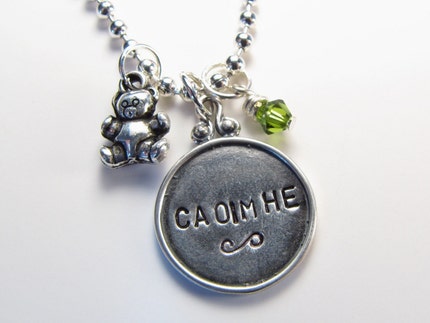
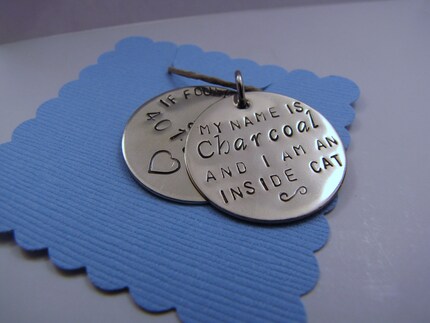

These are all for sale in my Etsy store: www.CaoimheLily.etsy.com
Subscribe to:
Posts (Atom)